

10.4 服务与身份认证
Istio提供了如下两种类型的身份认证:
·传输认证 ,也称为服务间的身份认证:验证直连的客户端,Istio提供双向TLS作为传输认证的全栈解决方案。我们可以在不修改应用代码的情况下轻松使用双向TLS,它有如下特点:
·为每一个服务提供强大的身份,表示其角色,以实现跨集群和云的互通性。
·为服务间和终端用户到服务的通信加密。
·提供密钥管理系统来自动化密钥和证书的生成、分发以及轮换。
·来源认证 ,也称为终端用户身份认证:验证请求来源客户端,把它们作为终端用户或设备。Istio在请求级别使用JSON Web Token(JWT)来验证并简化开发者对Auth0、Firebase、Google Auth以及自定义认证的对接工作。
Istio认证架构如图10-2所示。
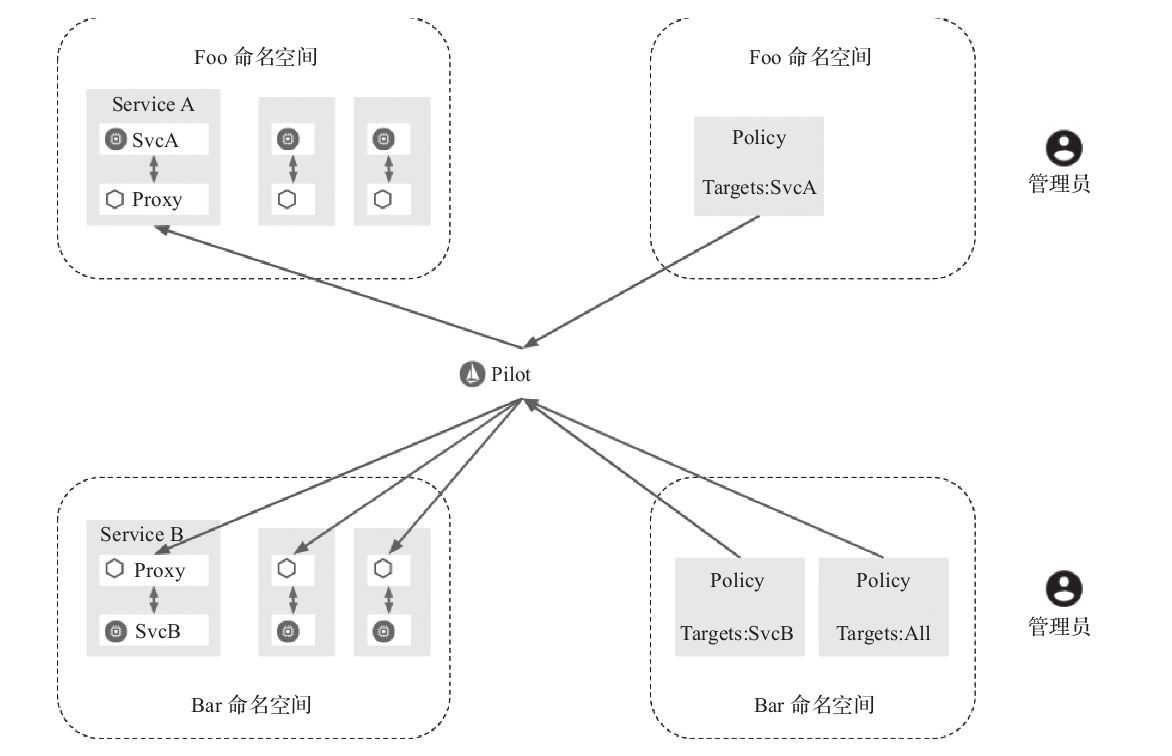
图10-2 Istio认证架构(图片来源:Istio官方网站)
管理员可以通过Pilot提供的API为每个命名空间中的服务设置访问策略。
Istio将传输认证和来源认证两种类型的身份验证以及凭证中的其他声明传输到下一层供授权使用。
通过创建Policy对象来控制mTLS和JWT认证策略,Policy主要包含target列表、peer列表、origin列表、principalBinding参数,含义如下:
·target定义服务或目标地址。name字段必须要有,且只能写服务的短域名。如:必须写service-go而不能写全域名"service-go.default.svc.cluster.local"。ports字段可以指定只对服务特定端口请求应用Policy认证策略,是一个PortSelector对象的列表,PortSelector包含name和number字段,number字段指定端口号,name字段指定端口名,number和name只能选择其中一个。
·peer定义mTLS相关的配置,mtls字段定义是否使用mTLS。mtls包含一个可以指定TLS模式的mode字段,当指定为STRICT时表示客户端必须使用TLS连接,当指定为PERMISSIVE时表示客户端既可以使用TLS连接,也可以使用普通连接。默认为STRICT。
·origin定义来源认证JWT的相关配置,jwt字段定义JWT相关的参数配置,可以指定issuer、audiences、jwksUri、jwtHeaders、jwtParams的配置。JWT(JSON Web Token)是一种常用的简单认证方式,JWK(JSON Web Key)提供了一种可以用来验证JWT正确性的机制,JWK中包含用来验证JWT正确性的密钥信息 [1] 。audiences指定JWT授权可用的网站,jwksUri指定JWK集合的存储地址,jwtHeaders指定客户端请求时JWT存储在请求头的哪个字段中,jwtParams指定客户端请求时JWT存储在请求的哪个query参数中。
·principalBinding定义使用的身份,有两种选择:USE_PEER表示使用mTLS的传输认证身份,USE_ORIGIN表示使用来源认证的身份,默认为USE_PEER。 [2]
1.mTLS传输认证
mTLS配置包含服务端和客户端,服务端的配置表明服务端接收TLS加密的请求流量,客户端的配置表明客户端调用服务时使用TLS加密请求流量。下面介绍如何在不同的粒度上启用服务的mTLS。
(1)启用全局mTLS
网格开启全局mTLS:
apiVersion: authentication.istio.io/v1alpha1
kind: MeshPolicy
metadata:
  name: default
spec:
  peers:
  - mtls: {}
上述策略表明网格中只接受使用mTLS加密的请求,MeshPolicy类型的资源在整个网格内只能创建一个,且命名必须为default。
客户端开启全局mTLS:
apiVersion: networking.istio.io/v1alpha3
kind: DestinationRule
metadata:
  name: default
  namespace: default
spec:
  host: "*.local"
  trafficPolicy:
    tls:
      mode: ISTIO_MUTUAL
上述配置中"*.local"泛域名代表集群内的所有服务,此规则表明调用集群内的服务的请求都使用mTLS进行加密。
(2)启用命名空间级别mTLS
1 apiVersion: authentication.istio.io/v1alpha1
 2 kind: Policy
 3 metadata:
 4   name: default
 5   namespace: default
 6 spec:
 7   peers:
 8   - mtls: {}
 9 ---
10 apiVersion: networking.istio.io/v1alpha3
11 kind: DestinationRule
12 metadata:
13   name: default
14   namespace: default
15 spec:
16   host: "*.default.svc.cluster.local"
17   trafficPolicy:
18     tls:
19       mode: ISTIO_MUTUAL
第1~8行定义了名为default的Policy对象,表示对于default命名空间的服务默认情况下只允许mTLS加密的请求。
第10~19行定义了名为default的DestinationRule对象,表示对于所有"*.default.svc.cluster.local"服务的请求都使用mTLS进行加密。
(3)启用服务级别mTLS
1 apiVersion: authentication.istio.io/v1alpha1
 2 kind: Policy
 3 metadata:
 4   name: httpbin
 5   namespace: bar
 6 spec:
 7   targets:
 8   - name: httpbin
 9   peers:
10   - mtls: {}
11 ---
12 apiVersion: networking.istio.io/v1alpha3
13 kind: DestinationRule
14 metadata:
15   name: httpbin
16   namespace: bar
17 spec:
18   host: "httpbin.bar.svc.cluster.local"
19   trafficPolicy:
20     tls:
21       mode: ISTIO_MUTUAL
第1~10行定义了名为httpbin的Policy对象,表示对于bar命名空间的httpbin服务只允许mTLS加密的请求。
第12~21行定义了名为httpbin的DestinationRule对象,表示对于"httpbin.bar.svc.cluster.local"的服务请求都使用mTLS进行加密。
(4)启用端口级别mTLS
1 apiVersion: authentication.istio.io/v1alpha1
 2 kind: Policy
 3 metadata:
 4   name: httpbin
 5   namespace: bar
 6 spec:
 7   targets:
 8   - name: httpbin
 9     ports:
10     - number: 1234
11   peers:
12   - mtls: {}
13 ---
14 apiVersion: networking.istio.io/v1alpha3
15 kind: DestinationRule
16 metadata:
17   name: httpbin
18   namespace: bar
19 spec:
20   host: httpbin.bar.svc.cluster.local
21   trafficPolicy:
22     tls:
23       mode: DISABLE
24     portLevelSettings:
25     - port:
26         number: 1234
27       tls:
28         mode: ISTIO_MUTUAL
第1~12行定义了名为httpbin的Policy对象,表示对于bar命名空间的httpbin服务的1234端口只允许mTLS加密的请求。
第14~28行定义了名为httpbin的DestinationRule对象,表示对于"httpbin.bar.svc.cluster.local"的服务,默认情况下不使用mTLS加密请求,但对于1234端口的请求使用mTLS进行加密。
优先级说明: 服务级别和端口级别的mTLS策略比命名空间级别的mTLS策略的优先级更高,命名空间级别的mTLS策略比网格全局的mTLS策略的优先级更高。
2.终端用户身份认证
使用JWT进行终端用户身份认证。
基本使用示例:
apiVersion: authentication.istio.io/v1alpha1
kind: Policy
metadata:
  name: jwt-example
  namespace: foo
spec:
  targets:
  - name: httpbin
  origins:
  - jwt:
    issuer: "testing@secure.istio.io"
    jwksUri: "https://raw.githubusercontent.com/istio/istio/release-1.0/security/
              tools/jwt/samples/jwks.json"
  principalBinding: USE_ORIGIN
自定义JWT头示例:
1 apiVersion: authentication.istio.io/v1alpha1
 2 kind: Policy
 3 metadata:
 4   name: jwt-example
 5   namespace: foo
 6 spec:
 7   targets:
 8   - name: httpbin
 9   origins:
10   - jwt:
11     issuer: "testing@secure.istio.io"
12     jwksUri: "https://raw.githubusercontent.com/istio/istio/release-1.0/
               security/tools/jwt/samples/jwks.json"
13     jwtHeaders:
14     - X-Auth
15   principalBinding: USE_ORIGIN
第13~14行定义把JWT放在请求的X-Auth中。
自定义query参数示例:
1 apiVersion: authentication.istio.io/v1alpha1
 2 kind: Policy
 3 metadata:
 4   name: jwt-example
 5   namespace: foo
 6 spec:
 7   targets:
 8   - name: httpbin
 9   origins:
10   - jwt:
11     issuer: "testing@secure.istio.io"
12     jwksUri: "https://raw.githubusercontent.com/istio/istio/release-1.0/
               security/tools/jwt/samples/jwks.json"
13     jwtParams:
14     - access_token
15   principalBinding: USE_ORIGIN
第13~14行定义把JWT放在请求query参数的access_token中。
自定义JWT头与query参数结合使用示例:
1 apiVersion: authentication.istio.io/v1alpha1
 2 kind: Policy
 3 metadata:
 4   name: jwt-example
 5   namespace: foo
 6 spec:
 7   targets:
 8   - name: httpbin
 9   origins:
10   - jwt:
11     issuer: "testing@secure.istio.io"
12     jwksUri: "https://raw.githubusercontent.com/istio/istio/release-1.0/
               ecurity/tools/jwt/samples/jwks.json"
13     jwtHeaders:
14     - X-Auth
15     jwtParams:
16     - access_token
17   principalBinding: USE_ORIGIN
第13~16行定义可以把JWT放在请求的X-Auth中,也可以把JWT放在请求query参数的access_token中。
【实验一】 mTLS传输认证
(1)部署用于测试的服务
1)删除微服务的部署。
如果不暂时删除之前部署用于测试的微服务,可能会由于虚拟机集群资源和性能问题导致实验失败:
$ kubectl delete -f service/go/service-go.yaml
$ kubectl delete -f service/node/service-node.yaml
2)部署服务。
foo和bar命名空间中部署的服务流量都由Istio管理,属于Istio集群中的服务。legacy命名空间中部署的服务流量没有使用Istio管理,不属于Istio集群中的服务。使用如下命令部署服务:
$ kubectl create ns foo
$ kubectl apply -f <(istioctl kube-inject -f kubernetes/httpbin.yaml) -n foo
$ kubectl apply -f <(istioctl kube-inject -f kubernetes/sleep.yaml) -n foo
$ kubectl create ns bar
$ kubectl apply -f <(istioctl kube-inject -f kubernetes/httpbin.yaml) -n bar
$ kubectl apply -f <(istioctl kube-inject -f kubernetes/sleep.yaml) -n bar
$ kubectl create ns legacy
$ kubectl apply -f  kubernetes/httpbin.yaml -n legacy
$ kubectl apply -f  kubernetes/sleep.yaml -n legacy
3)查看部署服务的状态。
等待Pod全部为Running状态时再进行后面的实验步骤。使用如下命令查看服务状态:
$ kubectl get pod -n legacy
NAME                         READY       STATUS        RESTARTS       AGE
httpbin-b67975b8f-2z8v5      1/1         Running       0              67s
sleep-5875d97cd4-t4mdd       1/1         Running       0              66s
$ kubectl get pod -n foo
NAME                         READY       STATUS        RESTARTS       AGE
httpbin-6f9dfcf5d8-f8zwc     2/2         Running       0              85s
sleep-7584fcd546-sj2mn       2/2         Running       0              85s
$ kubectl get pod -n bar
NAME                         READY       STATUS        RESTARTS       AGE
httpbin-6f9dfcf5d8-tkp6n     2/2         Running       0              86s
sleep-7584fcd546-6rcv2       2/2         Running       0              85s
4)访问测试部署的服务是否正常。
有时可能由于虚拟机集群性能问题导致路由信息生效过慢,需要等一段时间再进行如下的测试。使用如下命令测试服务:
$ for from in "foo" "bar" "legacy"; do for to in "foo" "bar" "legacy"; do kubectl exec $(kubectl get pod -l app=sleep -n ${from} -o jsonpath={.items..metadata.name}) -c sleep -n ${from} -- curl http://httpbin.${to}:8000/ip -s -o /dev/null -w "sleep.${from} to httpbin.${to}: %{http_code}\n"; done; done
sleep.foo to httpbin.foo: 200
sleep.foo to httpbin.bar: 200
sleep.foo to httpbin.legacy: 200
sleep.bar to httpbin.foo: 200
sleep.bar to httpbin.bar: 200
sleep.bar to httpbin.legacy: 200
sleep.legacy to httpbin.foo: 200
sleep.legacy to httpbin.bar: 200
sleep.legacy to httpbin.legacy: 200
(2)测试全局mTLS
1)服务端启用全局mTLS:
$ kubectl apply -f istio/security/mtls-config-mesh-on.yaml
2)服务访问测试:
$ for from in "foo" "bar"; do for to in "foo" "bar"; do kubectl exec $(kubectl get pod -l app=sleep -n ${from} -o jsonpath={.items..metadata.name}) -c sleep -n ${from} -- curl http://httpbin.${to}:8000/ip -s -o /dev/null -w "sleep.${from} to httpbin.${to}: %{http_code}\n"; done; done
sleep.foo to httpbin.foo: 503
sleep.foo to httpbin.bar: 503
sleep.bar to httpbin.foo: 503
sleep.bar to httpbin.bar: 503
之前步骤的配置只是在服务端启用了全局mTLS,此时服务端只接受TLS加密的请求,客户端由于没有配置TLS加密,仍然使用没有经过TLS加密的请求,所以Istio网格中的所有请求均会失败,得到503响应码。
3)客户端启用mTLS:
$ kubectl apply -f istio/security/mtls-config-default-on.yaml
4)服务访问测试。
Istio集群中的服务相互访问:
$ for from in "foo" "bar"; do for to in "foo" "bar"; do kubectl exec $(kubectl get pod -l app=sleep -n ${from} -o jsonpath={.items..metadata.name}) -c sleep -n ${from} -- curl http://httpbin.${to}:8000/ip -s -o /dev/null -w "sleep.${from} to httpbin.${to}: %{http_code}\n"; done; done
sleep.foo to httpbin.foo: 200
sleep.foo to httpbin.bar: 200
sleep.bar to httpbin.foo: 200
sleep.bar to httpbin.bar: 200
从非Istio网格中的服务访问Istio网格中的服务:
$ for from in "legacy"; do for to in "foo" "bar"; do kubectl exec $(kubectl get pod -l app=sleep -n ${from} -o jsonpath={.items..metadata.name}) -c sleep -n ${from} -- curl http://httpbin.${to}:8000/ip -s -o /dev/null -w "sleep.${from} to httpbin.${to}: %{http_code}\n"; done; done
sleep.legacy to httpbin.foo: 000
command terminated with exit code 56
sleep.legacy to httpbin.bar: 000
command terminated with exit code 56
从Istio网格中的服务访问非Istio网格中的服务:
$ for from in "foo" "bar"; do for to in "legacy"; do kubectl exec $(kubectl get pod -l app=sleep -n ${from} -o jsonpath={.items..metadata.name}) -c sleep -n ${from} -- curl http://httpbin.${to}:8000/ip -s -o /dev/null -w "sleep.${from} to httpbin.${to}: %{http_code}\n"; done; done
sleep.foo to httpbin.legacy: 503
sleep.bar to httpbin.legacy: 503
上面步骤配置的规则表明,在客户端请求时也使用TLS进行加密,此时服务端与客户端均开启了TLS加密,所以Istio网格中的服务相互访问都会成功。默认情况下,非Istio网格中的服务访问Istio网格中的服务会失败,Istio网格中的服务访问非Istio网格中的服务也会失败。
5)关闭访问非Istio网格中的服务的TLS功能:
$ kubectl apply -f istio/security/mtls-httpbin-legacy-off.yaml
6)再次测试从Istio网格中的服务访问非Istio网格中的服务:
$ for from in "foo" "bar"; do for to in "legacy"; do kubectl exec $(kubectl get pod -l app=sleep -n ${from} -o jsonpath={.items..metadata.name}) -c sleep -n ${from} -- curl http://httpbin.${to}:8000/ip -s -o /dev/null -w "sleep.${from} to httpbin.${to}: %{http_code}\n"; done; done
sleep.foo to httpbin.legacy: 200
sleep.bar to httpbin.legacy: 200
7)访问Kubernetes API Server:
$ TOKEN=$(kubectl describe secret $(kubectl get secrets | grep default | cut -f1 -d ' ') | grep -E '^token' | cut -f2 -d':' | tr -d '\t')
$ kubectl exec $(kubectl get pod -l app=sleep -n foo -o jsonpath={.items..metadata.name}) -c sleep -n foo -- curl https://kubernetes.default/api --header "Authorization: Bearer $TOKEN" --insecure -s -o /dev/null -w "%{http_code}\n"
000
command terminated with exit code 35
8)关闭访问Kubernetes API Server的mTLS功能:
$ kubectl apply -f istio/security/mtls-apiserver-off.yaml
9)再次访问Kubernetes API Server:
$ TOKEN=$(kubectl describe secret $(kubectl get secrets | grep default | cut -f1 -d ' ') | grep -E '^token' | cut -f2 -d':' | tr -d '\t')
$ kubectl exec $(kubectl get pod -l app=sleep -n foo -o jsonpath={.items..metadata.name}) -c sleep -n foo -- curl https://kubernetes.default/api --header "Authorization: Bearer $TOKEN" --insecure -s -o /dev/null -w "%{http_code}\n"
200
10)清理相关mTLS规则:
$ kubectl delete -f istio/security/mtls-config-mesh-on.yaml
$ kubectl delete -f istio/security/mtls-config-default-on.yaml
$ kubectl delete -f istio/security/mtls-httpbin-legacy-off.yaml
$ kubectl delete -f istio/security/mtls-apiserver-off.yaml
(3)测试命名空间级别mTLS
1)启用foo命名空间的mTLS功能:
$ kubectl apply -f istio/security/mtls-namespace-foo-on.yaml
2)访问服务:
$ for from in "foo" "bar" "legacy"; do for to in "foo" "bar" "legacy"; do kubectl exec $(kubectl get pod -l app=sleep -n ${from} -o jsonpath={.items..metadata.name}) -c sleep -n ${from} -- curl http://httpbin.${to}:8000/ip -s -o /dev/null -w "sleep.${from} to httpbin.${to}: %{http_code}\n"; done; done
sleep.foo to httpbin.foo: 200
sleep.foo to httpbin.bar: 200
sleep.foo to httpbin.legacy: 200
sleep.bar to httpbin.foo: 200
sleep.bar to httpbin.bar: 200
sleep.bar to httpbin.legacy: 200
sleep.legacy to httpbin.foo: 000
command terminated with exit code 56
sleep.legacy to httpbin.bar: 200
sleep.legacy to httpbin.legacy: 200
foo命名空间开启了mTLS功能,并设置了去往foo命名空间的流量默认使用mTLS加密,当legacy命名空间请求foo命名空间时,由于legacy命名空间的请求没有使用mTLS加密,导致请求失败。
(4)测试服务级别mTLS
1)启用bar命名空间的httpbin服务的mTLS功能:
$ kubectl apply -f istio/security/mtls-service-httpbin-on.yaml
2)访问服务:
$ for from in "foo" "bar" "legacy"; do for to in "foo" "bar" "legacy"; do kubectl exec $(kubectl get pod -l app=sleep -n ${from} -o jsonpath={.items..metadata.name}) -c sleep -n ${from} -- curl http://httpbin.${to}:8000/ip -s -o /dev/null -w "sleep.${from} to httpbin.${to}: %{http_code}\n"; done; done
sleep.foo to httpbin.foo: 200
sleep.foo to httpbin.bar: 200
sleep.foo to httpbin.legacy: 200
sleep.bar to httpbin.foo: 200
sleep.bar to httpbin.bar: 200
sleep.bar to httpbin.legacy: 200
sleep.legacy to httpbin.foo: 000
command terminated with exit code 56
sleep.legacy to httpbin.bar: 000
command terminated with exit code 56
sleep.legacy to httpbin.legacy: 200
由于bar命名空间的httpbin服务开启了mTLS功能,导致legacy命名空间请求bar命名空间的httpbin服务也出现了失败的情况。
3)清理测试:
$ kubectl delete -f istio/security/mtls-namespace-foo-on.yaml
$ kubectl delete -f istio/security/mtls-service-httpbin-on.yaml
(5)测试服务端口级别mTLS
1)启用bar命名空间的httpbin服务的1234端口的mTLS功能:
$ kubectl apply -f istio/security/mtls-service-httpbin-port-on.yaml
2)访问服务:
$ kubectl exec $(kubectl get pod -l app=sleep -n legacy -o jsonpath={.items..metadata.name}) -c sleep -n legacy -- curl http://httpbin.bar:8000/ip -s -o /dev/null -w "%{http_code}\n"
200
bar命名空间的httpbin服务只在端口1234开启了mTLS功能,当legacy命名空间请求bar命名空间的httpbin服务时,由于使用的是8000端口,服务可以不使用TLS加密,正常通过。
3)清理:
$ kubectl delete -f istio/security/mtls-service-httpbin-port-on.yaml
【实验二】 终端用户身份认证
本实验需要部署实验一部署的3个命名空间的httpbin服务。
1)创建路由规则。创建httpbin的路由规则和Gateway:
$ kubectl apply -f istio/route/gateway-httpbin-http.yaml -n foo
2)访问httpbin服务:
$ curl http://11.11.11.111:31380/headers -s -o /dev/null -w "%{http_code}\n"
200
3)创建JWT认证策略:
$ kubectl apply -f istio/security/jwt-httpbin.yaml
4)访问测试。由于开启了JWT认证,直接访问就会返回没有认证的401响应码:
$ curl http://11.11.11.111:31380/headers -s -o /dev/null -w "%{http_code}\n"
401
5)使用JWT访问测试。此时使用JWT的token进行访问,会得到正常的响应码:
$ TOKEN=$(curl https://raw.githubusercontent.com/istio/istio/release-1.0/security/tools/jwt/samples/demo.jwt -s)
$ curl --header "Authorization: Bearer $TOKEN" http://11.11.11.111:31380/headers -s -o /dev/null -w "%{http_code}\n"
200
6)配置Python环境。配置Python环境的同时下载用于测试的源码文件:
$ sudo yum install -y python-pip wget
$ sudo pip install jwcrypto -i http://pypi.douban.com/simple/ --trusted-host pypi.douban.com
$ mkdir jwt-test
$ wget -O jwt-test/key.pem https://raw.githubusercontent.com/istio/istio/release-1.0/security/tools/jwt/samples/key.pem
$ wget -O jwt-test/gen-jwt.py https://raw.githubusercontent.com/istio/istio/release-1.0/security/tools/jwt/samples/gen-jwt.py
7)生成token并访问服务。生成有效期很短的token,测试token过期特性:
$ TOKEN=$(python jwt-test/gen-jwt.py jwt-test/key.pem --expire 5)
$ for i in `seq 1 10`; do curl --header "Authorization: Bearer $TOKEN" http://11.11.11.111:31380/headers -s -o /dev/null -w "%{http_code}\n"; sleep 1; done
200
200
200
200
401
401
401
401
401
401
从以上结果可以看出,由于设置的token有效期仅为5秒,只有前几次的请求成功,后面的请求都返回没有认证的401响应码,说明token已经过期。注意:由于生成token到复制命令执行请求可能存在短暂时间间隔,真正的有效期可能已经不足5秒,导致看到的200响应码不足5次。
【实验三】 传输认证与终端认证配合使用
本实验需要部署实验一部署的3个命名空间的httpbin服务。
1)创建同时使用传输认证mTLS与终端认证JWT策略:
$ kubectl apply -f istio/security/jwt-mtls-httpbin.yaml
2)访问服务:
$ TOKEN=$(curl https://raw.githubusercontent.com/istio/istio/release-1.0/security/tools/jwt/samples/demo.jwt -s)
$ curl --header "Authorization: Bearer $TOKEN" http://11.11.11.111:31380/headers -s -o /dev/null -w "%{http_code}\n"
200
$ kubectl exec $(kubectl get pod -l app=sleep -n foo -o jsonpath={.items..metadata.name}) -c sleep -n foo -- curl http://httpbin.foo:8000/ip -s -o /dev/null -w "%{http_code}\n"
401
$ kubectl exec $(kubectl get pod -l app=sleep -n foo -o jsonpath={.items..metadata.name}) -c sleep -n foo -- curl http://httpbin.foo:8000/ip -s -o /dev/null -w "%{http_code}\n" --header "Authorization: Bearer $TOKEN"
200
$ kubectl exec $(kubectl get pod -l app=sleep -n legacy -o jsonpath={.items..metadata.name}) -c sleep -n legacy -- curl http://httpbin.foo:8000/ip -s -o /dev/null -w "%{http_code}\n" --header "Authorization: Bearer $TOKEN"
000
command terminated with exit code 56
对比测试结果可知,当没有TLS加密请求时,请求直接失败;当以TLS加密请求时,如果没有使用携带token会返回没有认证的401响应码;只有当以TLS加密请求并携带token时,请求才会成功,说明mTLS与JWT配合使用已经生效。
3)清理认证策略:
$ kubectl delete -f istio/security/jwt-mtls-httpbin.yaml
4)创建自定义认证头规则:
$ kubectl apply -f istio/security/jwt-httpbin-custom-header.yaml
5)访问服务:
$ curl --header "X-Auth: $TOKEN" http://11.11.11.111:31380/headers -s -o /dev/null -w "%{http_code}\n"
200
6)创建自定义认证query参数规则:
$ kubectl apply -f istio/security/jwt-httpbin-custom-query.yaml
7)访问服务:
$ curl http://11.11.11.111:31380/headers?access_token=$TOKEN -s -o /dev/null -w "%{http_code}\n"
200
8)创建自定义认证头结合自定义认证query参数规则:
$ kubectl apply -f istio/security/jwt-httpbin-custom-header-query.yaml
9)访问服务:
$ curl --header "X-Auth: $TOKEN" http://11.11.11.111:31380/headers -s -o /dev/null -w "%{http_code}\n"
200
$ curl http://11.11.11.111:31380/headers?access_token=$TOKEN -s -o /dev/null -w "%{http_code}\n"
200
10)清理:
$ kubectl delete ns foo bar legacy
[1] JWT与JWK的区别和联系可以参考文章https://redthunder.blog/2017/06/08/jwts-jwks-kids-x5ts-oh-my/。
[2] 详细说明可以参考官方文档https://istio.io/docs/reference/config/istio.authentication.v1alpha1/。