

6.4 在Istio中部署微服务
在前面的实验中,服务部署完成之后,可以单独访问service-js服务的前端静态页面,也可以单独访问service-python实现的API接口,但是仍然不能实现两者相互配合调用,展现整个服务调用链情况。本节就带你体验一下Istio的简单路由功能,并了解整个微服务的调用流程,对于本节使用的Istio路由配置文件,不必太过关注细节,这些功能会在后续章节中详细说明。
1)在default命令空间开启自动注入功能:
$ kubectl label namespace default istio-injection=enabled
2)部署服务:
$ kubectl apply -f service/go/service-go.yaml
$ kubectl apply -f service/node/service-node.yaml
$ kubectl apply -f service/lua/service-lua.yaml
$ kubectl apply -f service/python/service-python.yaml
$ kubectl apply -f service/js/service-js.yaml
3)查看服务部署状态。
使用如下的命令查看服务的部署状态:
$ kubectl get pod
NAME                                 READY   STATUS    RESTARTS   AGE
service-go-v1-7cc5c6f574-sjqmk       2/2     Running   0          39s
service-go-v2-7656dcc478-mfxsk       2/2     Running   0          39s
service-js-v1-55756d577-nzwmb        2/2     Running   0          21s
service-js-v2-86bdfc86d9-w6t9s       2/2     Running   0          21s
service-lua-v1-5c9bcb7778-ccxxq      2/2     Running   0          37s
service-lua-v2-75cb5cdf8-zbl2r       2/2     Running   0          37s
service-node-v1-d44b9bf7b-lpkqn      2/2     Running   0          37s
service-node-v2-86545d9796-5ct7q     2/2     Running   0          37s
service-python-v1-79fc5849fd-hl4vn   2/2     Running   0          36s
service-python-v2-7b6864b96b-4xjlp   2/2     Running   0          36s
与之前部署不同,现在每个服务启动的Pod有两个容器,其中一个容器是被注入的Envoy代理,当所有服务的Pod处于Running状态时,再进行后续的实验步骤。
4)应用路由规则,将service-js服务的流量全部导入v1版本:
$ kubectl apply -f istio/route/gateway-js-v1.yaml
gateway.networking.istio.io/istio-lab-gateway created
destinationrule.networking.istio.io/service-js created
virtualservice.networking.istio.io/istio-lab created
$ kubectl get gateway
NAME                AGE
istio-lab-gateway   21s
$ kubectl get virtualservice
NAME                AGE
istio-lab           35s
$ kubectl get destinationrule
NAME                AGE
service-js          51s
5)在浏览器中访问测试。
此时通过浏览器访问地址http://11.11.11.112:31380/ ,并点击“发射”按钮,会看到如图6-7所示的服务调用图。
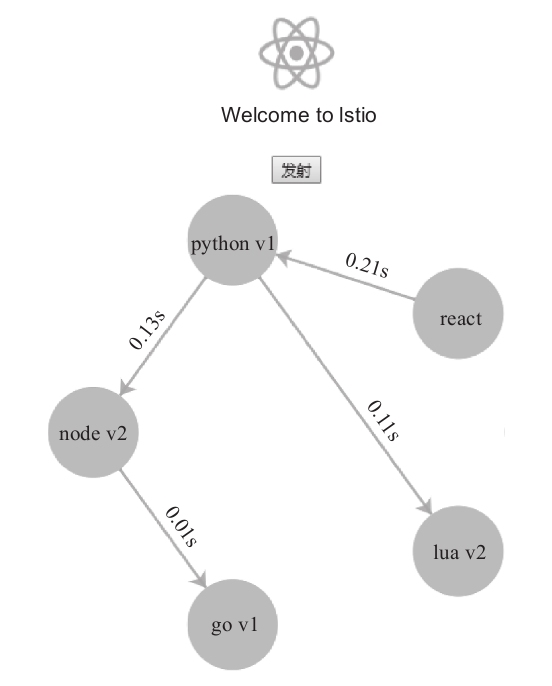
图6-7 在Istio中部署微服务
6)应用路由规则,将流量全部导入service-js的v2版本:
$ kubectl delete -f istio/route/gateway-js-v1.yaml
gateway.networking.istio.io "istio-lab-gateway" deleted
destinationrule.networking.istio.io "service-js" deleted
virtualservice.networking.istio.io "istio-lab" deleted
$ kubectl apply -f istio/route/gateway-js-v2.yaml
gateway.networking.istio.io/istio-lab-gateway created
destinationrule.networking.istio.io/service-js created
virtualservice.networking.istio.io/istio-lab created
$ kubectl get gateway
NAME                AGE
istio-lab-gateway   16s
$ kubectl get virtualservice
NAME               AGE
istio-lab          31s
$ kubectl get destinationrule
NAME               AGE
service-js         47s
7)在浏览器中访问测试。
此时通过刷新浏览器,点击“发射”按钮,应该看到Vue版本的服务调用图,如图6-8所示。

图6-8 Vue版本的服务调用
8)清理:
$ kubectl label namespace default istio-injection-
$ kubectl delete -f istio/route/gateway-js-v2.yaml
$ kubectl delete -f service/go/service-go.yaml
$ kubectl delete -f service/node/service-node.yaml
$ kubectl delete -f service/lua/service-lua.yaml
$ kubectl delete -f service/python/service-python.yaml
$ kubectl delete -f service/js/service-js.yaml
 实验时可能会由于虚拟机性能不足,出现创建了路由但是没有达到实现的效果,这是由于路由虽然已经创建成功,但可能由于机器性能问题,导致路由规则并没能生效,此时可能需要多等一段时间或者多次删除重建。如果还是无法达到实验效果,可以参考第2章2.1.3节“问题及解决方案”。